Tuesday, November 28, 2006

The versions of Cakewalk Sonar

I am an avid user of Cakewalk's Sonar, and people are always asking me what version to get, so I put this article together to shed some light on the four versions of Sonar currently available.

Cakewalk's SONAR is a full featured recording/editing/mixing program that is easy to use but very powerful. I use SONAR Producer for producing music for films because the producer's version supports a video track, and SONAR works well with timecode and MIDI. In my opinion, it's the easiest to learn and most intuitive program on the market right now. I can whole-heartedly recommend any of the versions of Sonar.

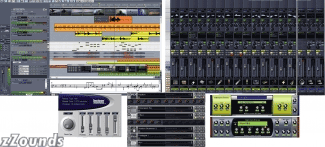
Sonar is available in three versions. As you can see from the screenshots, they are very similar programs. Screenshots are from zZounds.com.


Producer ($399 as of this writing)

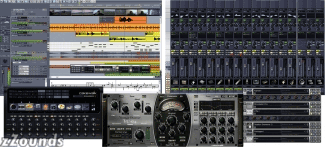
Sonar Producer Edition pretty much has it all! It can record up to 64 bit, 500kHz and has a 64 bit audio processing engine. It supports over 30 surround sound setups and has a very nice surround panner setup that makes surround mixing painless. Producer is the only version that supports a video thumbnail track, essential for film and video work. It also supports many formats of surround mixing. 31 audio plugins and 5 virtual instruments are included. To get a great deal on Sonar Producer Edition, visit zZounds.com


Studio ($299 as of this writing)

The Studio Edition is the same as Producer without the video track and the large number of sourround sound formats.To get a great deal on Sonar Studio Edition, visit zZounds.com


Home Studio XL ($199 as of this writing)

Home Studio XL supports 64 tracks of 24 bit, 192 kHz audio. Home Studio XL doesn't have all the professional features of Studio and Producer, but can handle most home recording tasks with lots of power to spare. It does come with 15 audio and 9 MIDI effects. I would recommend this version to most home recordists. To get a great deal on Sonar Home Studio XL, visit zZounds.com

Home Studio ($99 as of this writing)

Home Studio is the same as Home Studio XL, only does not include the extra effects. To get a great deal on Sonar Home Studio, visit zZounds.com

Monday, November 27, 2006

Choosing a pair of studio monitors

Sound!
This is the single most important part of it all. Get out there and listen to as many speakers as you can! Bring a recording you are familiar with. When you listen, make sure to ask the sales person to turn off all equalisation and signal processing, so all you are hearing is the speakers. Studio monitors and home speakers are not designed the same, because they don't do the same thing. Be prepared for real monitors to sound much more detailed, not really harsh, but a lot more in your face than home speakers.

Passive vs Powered
Passive speakers require an external power amplifier, while powered speakers have one built in. If you don't have an amplifier, powered speakers are a great choice because they are simpler to hook up, they take up less space, and the amplifier is matched to the speakers. Passive speakers are nice because they give you a little more flexibility, and you could even power them from a home stereo receiver. Most monitor speakers currently available are powered.

Connectivity
If you buy powered speakers, you need to check what kind of connections they have. Most have XLR, 1/4" and RCA jacks with a level control, while higher end monitors sometimes only have an XLR connector. Also, some monitors now have a digital input, which is usually a S/PDIF connection with an RCA or optical connector. If your computer interface or digital mixer has this kind of output, this may be a great choice for you. It's still nice when digital speakers have an analog input as well because it allows some flexibility if your setup changes or you need to hook your speakers up to something else temporarily, such as a keyboard.

Size
Generally, the larger the speaker, the more output it has, and the more bass it has. If you don't have a lot of room but require lots of strong bass, you may want to consider a subwoofer. Also, make sure the speakers you want fit where you want to put them! This is easy to overlook.

Magnetic Shielding
If your monitors will be close to a tube type computer or video monitor, make sure they are magnetically shielded. Even if you do get shielded monitors, they may need to be a little waise away from your monitor. This isn't an issue with flat panel LCD screens, only tube type monitors.

Frequency Response
You want the frequency response to be as wide and smooth as possible.

Hooking them Up
Get a high quality cable to hook your monitors up with, and try to keep it as short as possible. I recommend Mogami or Monster Cable for this.

Power
Keep the power cables away from the audio cables if at all possible, and plug your monitors into a power conditioner to reduce noise.

For my studio, I chose the Dynaudio BM5A. They were pricey, but after hearing a lot of studio monitors, I realized they were well worth it. The other monitors I have liked working with are Mackie HR824. Adding a subwoofer is a good idea, too, especially if you work with bass heavy material or film sound. Not having a sub will cause you to turn the lows too high in the mix, so small monitors without a sub is not usually a good idea. I really like the Mackie HRS120 sub.

Sunday, November 26, 2006

Building your own cables...why not?

Recently, I got into making my own cables for my studio. I got a great deal on some Mogami microphone wire at a local music store and thought what the heck. I got some Neutrik XLR connectors, and started soldering...

Was it worth it?

I got a 500' roll of wire for $60, which comes out to 12 cents a foot. The Neutrik ends were $2.95 each from zzounds.com. I used the Neutrik NC3MX and the Neutrik NC3FX. I have seen cheaper XLR connectors for as low as a dollar each. To make a 20' cable costs around $10.40. I tested them and made sure they worked before I used them with any high end mics or my main mixing console. I hooked up my vocal microphone, the Shure KSM32, directly to my mixer, with the channel direct out going to a hard disk recorder. I made some test recordings with my new cable, and with a "no-name" cable that came with a microphone. The results? There is a difference. I found that the cable made with Mogami wire had better highs and sounded clearer than the generic cable. Not to mention, the price can't be beat!

Saturday, November 25, 2006

The Shure SM-7

I just got a Shure SM-7 microphone and have been amazed at what it is capable of! I record a lot of voiceovers for videos, so that's why I got it. After recording the project I got the SM-7 for, I decided to try it out on some other things.

Electric guitar - the SM-7 did a great job here! It sounds a lot like an SM-57, but there is a lot more punch and detail, probably because the SM-7 has a much beefier transformer.

Bass drum - gets the job done well, but it requires a little more EQ than my Beta 52. I wouldn't but the SM-7 on bass drum unless I didn't have the Beta 52.

Floor tom - pretty impressive as well.

Leslie speaker - I put the SM-7 on the lower rotor of a Leslie speaker and really liked what I heard. Before I had been using the Beta 52, which is designed for kick drum, so it doesn't have much midrange. The SM-7 had a lot more lower midrange, which gave the organ a much beefier sound, especially for chords and walking bass. This is now the permanent parking spot for the SM-7 when not in use for other things.

Tenor sax - I have a friend who plays tenor sax with me, and we had previously used an SM-57 on that, but we were never happy with the sound. The SM-7 made the tenor sax sound a lot more detailed, so it cuts through the mix a lot better.

The SM-7 is really worth checking out! Think of it as a more refined SM-57. It works for the same applications as the 57, and then some. It sells for around $275 on eBay.

Free Audio Software

There is enough free software available to record an entire album, and record it well. The goal of this writing isn't to have an exhaustive list of free software, but to provide a list of software that would be enough to get going on a recording project.

Recording - I would start with Audacity. Audacity is a great multitrack recording program that works on the PC, Mac or Linux. It supports VST effects (with a simple add-on program) and MP3 export (also with an add-on program). Audacity is very easy to use, has great editing features, and supports unlimited undo. It will even run on pretty old computers - I have a friend running it on a Pentium 2 450Mhz on Windows 2000 and he recorded two albums with this setup! Not bad, eh?

In addition to downloading Audacity, also download the VST enabler and the LAME MP3 encoder. The VST enabler lets you use VST plugins in addition to the effects that already come with Audacity. Many VST plugins are available on the Internet for free. All of this is available at the Audacity website: http://audacity.sourceforge.net

Mastering - Once you mix down your songs to stereo files, editing and mastering can be done in WavePad. It is available at: http://www.nch.com.au/wavepad/

Synthesis - If you also want to generate sound using your computer, I would start with ReBirth. ReBirth is based on the Roland TR-808 and TR-909 drum machines and the TR-303 synthesizer. This program can generate great drum tracks quickly, as well as synth loops and more. This used to be a $200 program, but it became "obsolete" so it is now free. Go to http://www.rebirthmuseum.com/ to download it. ReBirth is available for both the Mac and the PC.

Between these three programs, you are on your way to making quality recordings with your computer.